Related posts
Feature
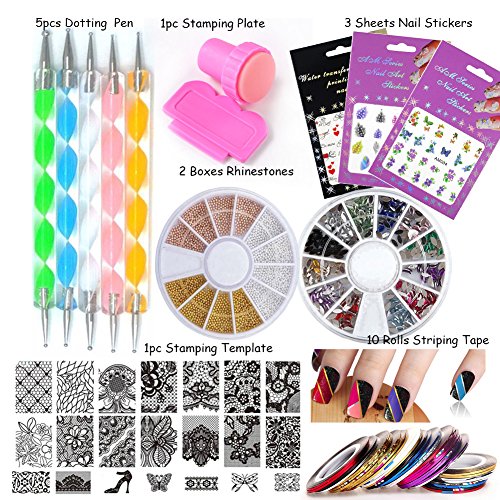
Set included : Dotting Tools, Nail Rhinestones, Nail Stamping Template, Nail Stamping Plate, Nail Roll Strip Line, Nail Sticker Decal.Nail rolls : 10 different colors rollers, Easy to create your unique style
Nail dotting pen: 5pcs vary usage pen to diy nail art
Nail Rhinestones Usage: Bags, Garment, Nail Art, Shoes, Cell Phone, Box, Pen, Furniture, Greeting Cards, etc
Nail Stamping Template : Pretty Nail Stamping Plates Lace Flower Animal Pattern Nail Art Stamp Stamping Template Image Plate Stencil Nails Tool
Description
Nail rolls : 10 different colors rollers, Easy to create your unique style2 Boxes Nail Rhinestones :In the need to place a drop of glue on the dot with a pen diamond stick (or with tweezers from the folder), and then dots of the points to the nail to make your favorite peach heart, and other different shapes. In short, according to the pattern you like it wants! Finish over and then coated with a layer of bright oil on the above, it can be more durable and more shiny.
How to use Nail rolls:
1. Clean the surface where the design is to be placed.
2. Select a design and peel off by your nail.
3. Place the design in nail/tip and rub it gently several times.
4. Apply top-coat for best result.
Nail Dotting Pen
You can use this useful tool for creating a marbling design, blending colors, creating swirls and textured finishes. It can also be used for creating dots
Two side nail dotting tools, one end with larger ball and another end with a smaller one for various marbleizing work
Can be used to create a marble effect with painting
Great for producing dots and daisies on nails
Nail Stamping
1. Apply base coat or regular polish on the nail.
2. Apply the nail polish to desired image within a plate. (Recommended: Use the Solid Color Nail Polish, so that the texture will be thicker than other nail polish)
3. Make a scraper leaned over 45 degrees and scrape excessive polish off quickly and strongly from inside to outside.
4. Immediately press the stamper with a gentle rolling motion to pick up the design. The image is transferred on the stamp.
5. Stamp the image on your nail with a gentle rolling motion. The image is transferred on your nail. 6. Repeat the above steps for all of your nails.
7. After stamping nail art,apply top coat for lasting wear.